
Added Items
In this Help Topic Hide
Added Items is the area where line entry codes can be used to quickly add line items to a group. The Added Items section can be found by going to the Estimate tab in a project.
If the project is a new estimate and no groups have been created yet, the Add Group pop-up will automatically open when selecting the Estimate tab.
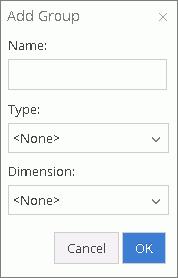
Type in a Name, then select a Type from that dropdown list and a Dimension from that dropdown list and click OK. The new Name will now be displayed below the Estimate tab, and an image of the selected type will be displayed to the right of the tab.
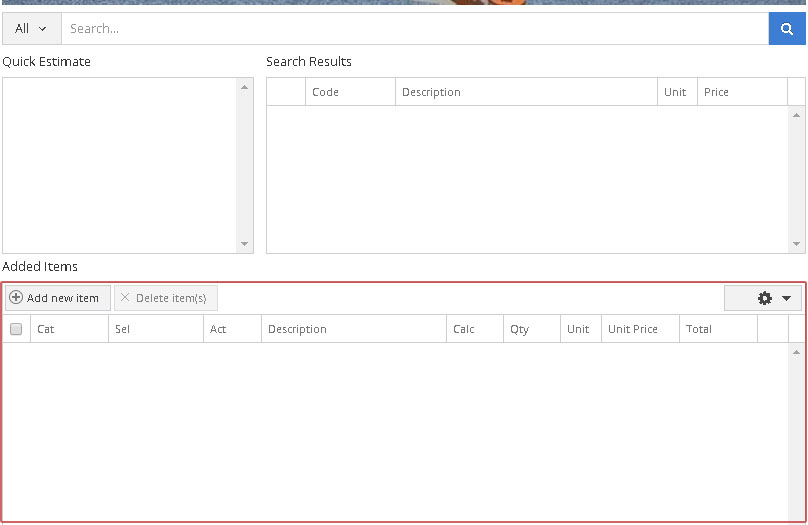
Under the reference image, the Quick Estimate, and the Item Results grids, you will find the Added Items area.
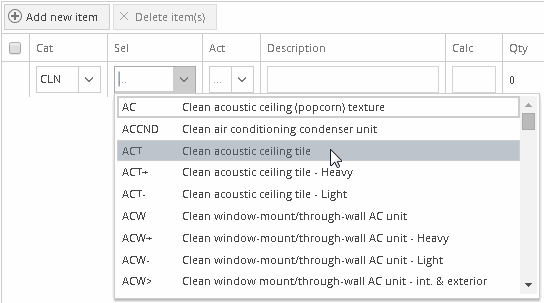
Click the Add new item button, or alternatively, you can press Ctrl+A on the keyboard, and a new Line Item line will be added. In the Cat field, begin typing a line item code. As you type, a predictive text dropdown will open. Continue typing or select the desired category from the dropdown. If you don’t know the Cat code, open the dropdown, and a list of all of the category codes will be shown. Once a valid Category has been entered, the cursor will automatically jump to the Selector field.
Now begin typing in the Sel field, and again, a predictive text dropdown will open. Continue typing or select the desired selector from the dropdown. If you don’t know the Sel code, open the dropdown, and a list of all of the selector codes that correspond to the selected category will be shown.
If an invalid Cat or Sel variable is entered, the field will be highlighted in red. When you hover your cursor over the red highlighted field, a tool tip will pop up indicating it is not a valid entry. To remove the error a valid Cat and Sel must be entered in their respective fields.
For added help in the line item entry, XactPRM has added tool tips for the Cat and Sel fields. If you click on the dropdown arrow to open the list, a pop-up dropdown list will give you what the 3 letter abbreviation represents for the Cat, or a full description for the Sel.

The Act will populate automatically with the default activity for the Cat and Sel that you have selected. If you wish to change the activity, click on the dropdown arrow adjacent to the Act field, and choose the desired activity. The following gives a breakdown of the various activities:
"+" Replace = Material, labor, and equipment to install the line item
"-" Remove = Labor and equipment to remove the line item
"R" Detach and Reset = Labor and equipment to uninstall a line item and then reinstall the same item
"&" Remove and Replace = Material, labor, and equipment to remove an existing line item and replace it with a new item
"M" Material Only = Just the material for the line item. No labor or equipment is included
"I" Install Only = Labor and equipment for installation, but no material for the line item
The Description field will populate automatically with the correct description for the Cat and Sel that you have selected. The Description can be changed by clicking anywhere in the field and adding, editing, or deleting the text as you normally would. Note, if changes are made to the Description, the text will change to green, to signify that a change to the default text has been made.
The Calc field is automatically populated with the default calculation for the entered line item. The Calc can be changed to a different variable or by entering a number value. To view the possible Calc variables, hover over the Calc column header and a list of possible variables and their meanings. The Calc field can also do simple arithmetic. For example, if you wanted to add 15% waste to a Carpet line item, typing in "1.15F" in the Calc field would multiply the Square feet of the floor (F) by 1.15, adding 15% more Square Feet of Carpet.

If an invalid Calc variable is entered, there will be a red outline placed around the field and when you hover over that field, an Invalid Calculation note will appear. In order to complete adding the line item, a valid calculation variable or number must be entered in the Calc field.

The Qty is the Quantity of the Line Item.
The Unit is automatically populated by the unit of measure for the line item that is entered. For example, drywall would be SF (Square Feet), moldings would be LF (Linear Feet), roofing shingles would be SQ (Squares), labor would be by HR (Hours), etc.
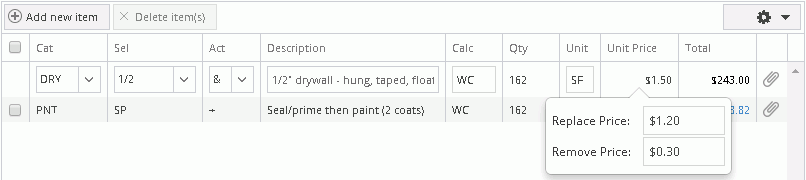
The Unit Price is set according to the price for that line item in the Price List selected for the project. The Unit Price value will be displayed in different ways depending on the Act. For example, an item that has an Act of &, will show a Remove Price and a Replace Price. An item that has an Act of +, will show just a Replace Price. An item that has an Act of -, will show just a Remove Price. An item that has an Act of M for Material Only, or I for Install Only, will show just a Custom Price. Note, if changes are made to the Unit Price, the total value will change to green, to signify that a change to the default value has been made.
The Total is the calculated value of the Qty x Unit Price. The Total is also a link similar to the components link found in the results section (see Item Results). However, the Total link multiplies the calculated value of each of the components, to show the actual values for that line item.
Click anywhere on the line of the item you wish to edit and the Cat, Sel, Act, Description, Calc, and Unit all become active. If you click in the Description area, then that field is where your cursor will be located, ready to make changes. The Qty, Unit Price, and Total, are either preset values, or calculations, and therefore not editable.
Click on the field you wish to edit, make the desired changes, and then either hit the <Enter> key or just click anywhere outside the line item that you are editing to save the changes.
Note: When changes are made to the Description or the Unit Price, that text and/or value will then be shown in green to signify that something was changed from the default value.
Line items can also be reordered. To change the order of line items in the added items area, simply click on the line item and drag it to the location that you wish.
XactPRM makes available a large variety of line items for the majority of circumstances that may exist. However, there may be unique items that occur on any given project. To allow you to account for those unique items, a miscellaneous line item is part of each category. For example, if you have a unique item on a property that needs to be painted and none of the PNT category line items quite match what is required, type in PNT for the category and MISC as the selector, and then in the description type an explanation of what is required. Leave the Calc field as 1 and then change the Unit and the Unit Price to represent the unit of measure and the actual cost for that specialty item.

To see a video help for this topic, click ![]()
Click on the attachment icon at the end of the line item entry.

A dialog box with 2 tabs will appear and the Notes tab will be selected ready to type. After entering the desired text, simply hit anywhere outside the note dialog box to close the note. Line items that have an attached note or image show the attachment icon as blue. Those with no attachment remain as black.

Line item notes that have been added will appear in the various reports that show the detail of line items.
To see a video help for this topic, click ![]()
Click on the attachment icon at the end of the line item entry.
A dialog box with 2 tabs will appear and the Notes tab will be selected. Click on the Images tab.
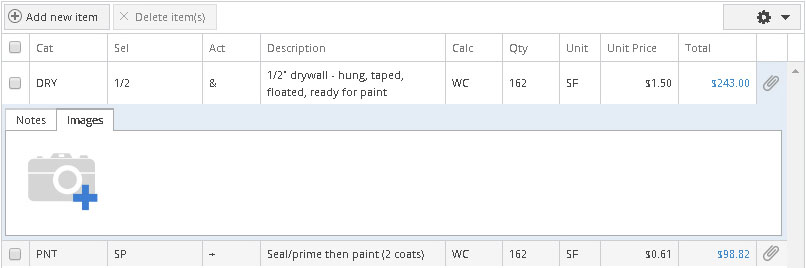
Click on the Camera + icon, to open the images UI.
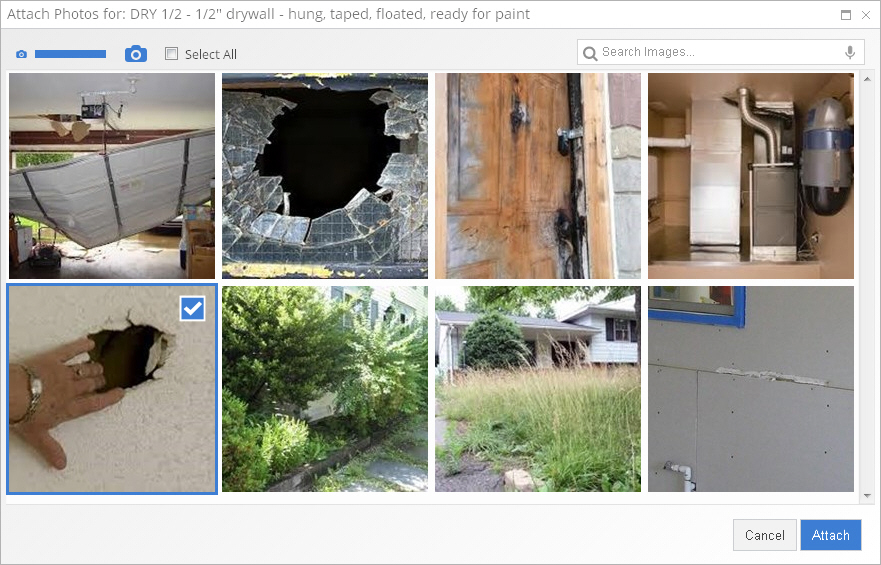
From here you can just click on the image(s) that you wish to add to the line item. As you click on an image it will become outlined in blue with a check-mark in the upper right corner. After selecting all the images you wish to add to the line item, click on the Attach button. The images UI will close and the selected images will now show in the Images tab.
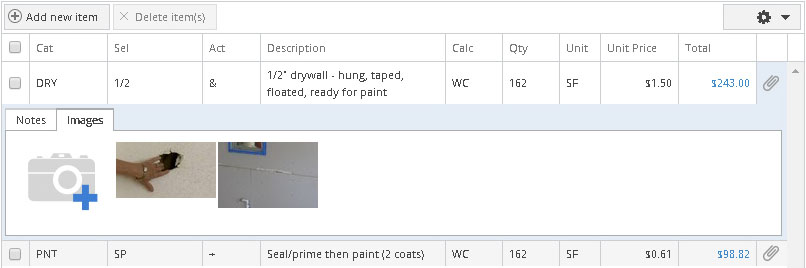
To remove an added image as an attachment, hover over the image and click on the "X" for that image. To change the order of the images, click and drag a photo to the location you would like it, and let go.
After entering the desired image(s), simply hit anywhere outside the note dialog box to close the dialog box. Line items that have an attached image or note show the attachment icon as blue. Those with no attachment remain as black.
Line item photo attachments that have been added will appear in the various reports that show the detail of line items.
Check the box at the beginning of the line item(s) you wish to remove. Multiple lines can be checked, and there is also a select all box in the top row.

When all line items are marked for deletion, click
the  button,
above the list of line item entries. When you click the Delete item(s)
button, a pop-up message will appear saying, “Are
you sure you want to delete the selected line item(s)?”. If you
click Cancel the pop-up message
will close and you will be taken back to the Added Items list and the
same items will remain checked. If you click OK
the pop-up message will close and you will be taken back to the Added Items list and the select
item(s) will have been removed.
button,
above the list of line item entries. When you click the Delete item(s)
button, a pop-up message will appear saying, “Are
you sure you want to delete the selected line item(s)?”. If you
click Cancel the pop-up message
will close and you will be taken back to the Added Items list and the
same items will remain checked. If you click OK
the pop-up message will close and you will be taken back to the Added Items list and the select
item(s) will have been removed.
For Technical Support please call 1-800-710-9228 or click here to access our live chat service.
Copyright 2004-2018 Xactware Solutions, Inc. All rights reserved.